This step adds the Dataships consent block directly into your Shopify checkout editor. It's a one-time action that replaces Shopify's default marketing consent checkbox with the Dataships widget. Once added, Dataships starts collecting consent at checkout automatically.
Finding the Installation screen
Go to Integrations → eCommerce Platforms in the Dataships sidebar, then open the Shopify card and click Configuration. Select the Installation tab.
If you're in the onboarding flow, you can reach this screen directly from the Step 6: Enable Dataships button.
Standard Shopify vs. Shopify Plus
The page automatically detects which plan you're on and shows the right instructions — you don't need to select anything yourself.
- Standard Shopify: You'll add the widget to your Thank You page only. That's the order confirmation page shown immediately after purchase.
- Shopify Plus: You'll add the widget to both the Information page (the first step of checkout, where shoppers enter their email) and the Thank You page. The Information page placement typically captures more consent because it appears earlier in the flow. You'll also see a Shop Pay sub-step.
Step-by-step instructions
If you're on standard Shopify (2 steps)
-
Navigate to your Shopify Admin Checkout Settings using the link shown on screen. The link opens in a new tab and is pre-filled with your store's URL — you may see a brief spinner while it loads.
-
Under Checkout customisation click on Customise
Then add the Dataships extension to your Thank You page:
- Select Thank You from the drop-down menu in the top center of the page
- Click + Add block under the Main section of the sidebar
- Choose Dataships Email Collection in the box that appears
- Click Save in the top right hand corner
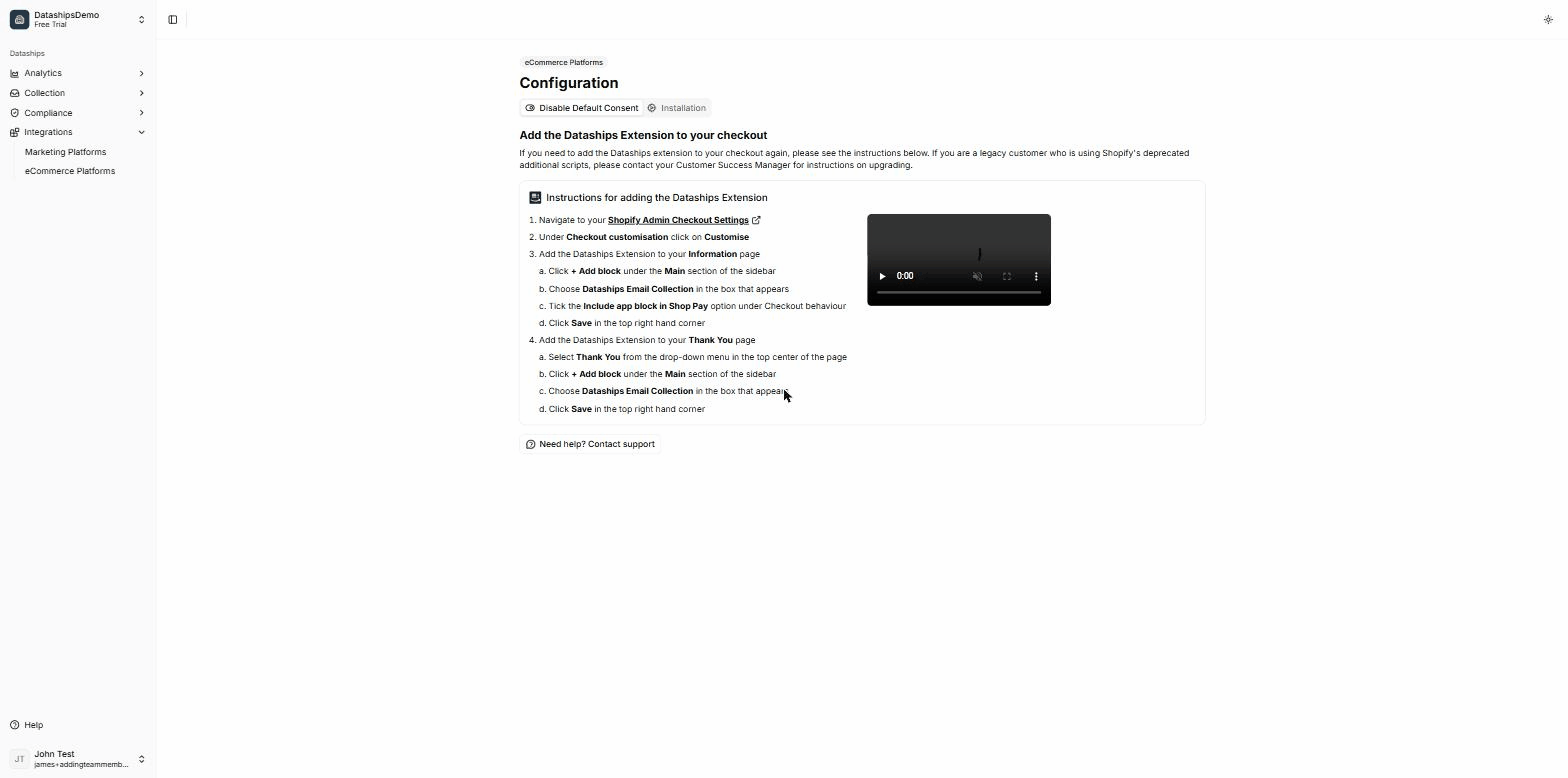
If you're on Shopify Plus (3 steps)
-
Navigate to your Shopify Admin Checkout Settings using the link shown on screen. The link opens in a new tab and is pre-filled with your store's URL — you may see a brief spinner while it loads.
-
Under Checkout customisation click on Customise
Then add the Dataships extension to your Information page:
- Click + Add block under the Main section of the sidebar
- Choose Dataships Email Collection in the box that appears
- Tick the Include app block in Shop Pay option under Checkout behaviour
- Click Save in the top right hand corner
-
Add the Dataships extension to your Thank You page:
- Select Thank You from the drop-down menu in the top center of the page
- Click + Add block under the Main section of the sidebar
- Choose Dataships Email Collection in the box that appears
- Click Save in the top right hand corner
A note on the video
The Instructions card includes a walkthrough video alongside the steps. Standard Shopify merchants see a video covering the Thank You page setup. Shopify Plus merchants see a longer video covering all three steps, including the Information page and Shop Pay option. The video plays automatically and loops — use the playback controls if you want to pause or rewind.
What to do next
If you're in the onboarding flow, click Next at the bottom of the page — this is step 6 of 6 and completes your onboarding setup. Otherwise, you're all done. The widget will start appearing at checkout immediately.
If you run into any issues, email support@dataships.io and the team will help you through it.
Frequently asked questions
How do I know if the widget is working?
The easiest way is to complete a test order in your store and check whether the Dataships consent block appears at checkout. You can also check your Dataships dashboard — once the widget is live, you'll start seeing consent events recorded there. Note that the Installation screen itself has no way to confirm whether the Shopify steps have been completed; it's purely a guide.
I'm not sure if I'm on Shopify Plus — how can I tell?
The Installation screen detects this automatically from your account data, so you'll see the right instructions without needing to check. If you want to confirm your plan, go to your Shopify Admin, open Settings → Plan, and look for "Shopify Plus" in your current subscription details.
What's the Information page vs. the Thank You page?
The Information page is the first step of the Shopify checkout flow — it's where shoppers enter their email address and contact details before paying. It's only available on Shopify Plus. The Thank You page (also called the order confirmation page) is shown to all shoppers after a purchase is completed. Adding the widget to both pages — when available — gives you more opportunities to collect consent at high-intent moments.