.png?width=250&height=45&name=Full_logo_dark%20(1).png)
Overview
Dataships automatically syncs consented email subscribers from checkout to Emarsys using an API credential, keeping your contact lists and Opt-in status current without manual data transfers. Opt-outs made inside Emarsys are sent back to Dataships every hour, so consent stays in sync on both sides.
Setup has four steps and takes around 20 minutes:
- Create an API credential in Emarsys
- Save your credentials in Dataships
- Configure your email lists
- Set up the opt-out webhook in Emarsys
Finding the Integration
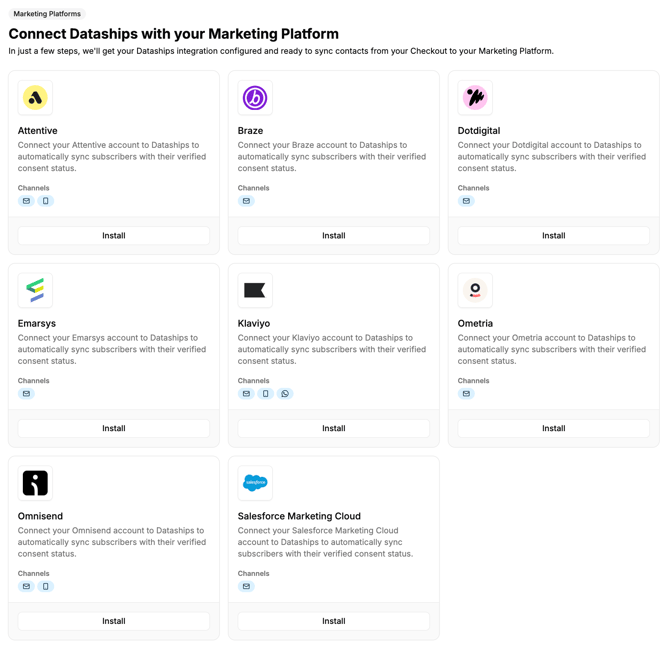
Go to Integrations › Marketing Platforms in the Dataships Control Panel, find the Emarsys card, and click Install.
If Emarsys is already installed, you can update it via Configure › Authentication.
Step 1: Create an API Credential in Emarsys
- Sign into Emarsys and go to Management › Account Management › API Credentials
- Click Create API Credentials
- Copy the Client ID, Client Secret, API Basepath and Token Endpoint
- On the credential, clear any Status filter on the Permissions table, then enable the permissions listed below
- Click Save Settings
- Note the Business Area you want Dataships to use. You can find it under Account Management › Business Areas; for most accounts it is DEFAULT
Permissions to enable:
- contact.fields.list, contact.fields.create
- contact.contacts.bulk.read, contact.contacts.bulk.create, contact.contacts.bulk.update, contact.contacts.bulk.delete, contact.contacts.businessAreaAssignments.bulk.upsert
- contactlist.list, contactlist.create, contactlist.contact.add, contactlist.contact.delete
- customer.settings
Important: Emarsys shows the Client Secret only once, when the credential is created. Copy it before leaving the page.
Tip: Keep the API credential dedicated to Dataships rather than reusing an existing one.
Step 2: Save Your Credentials in Dataships
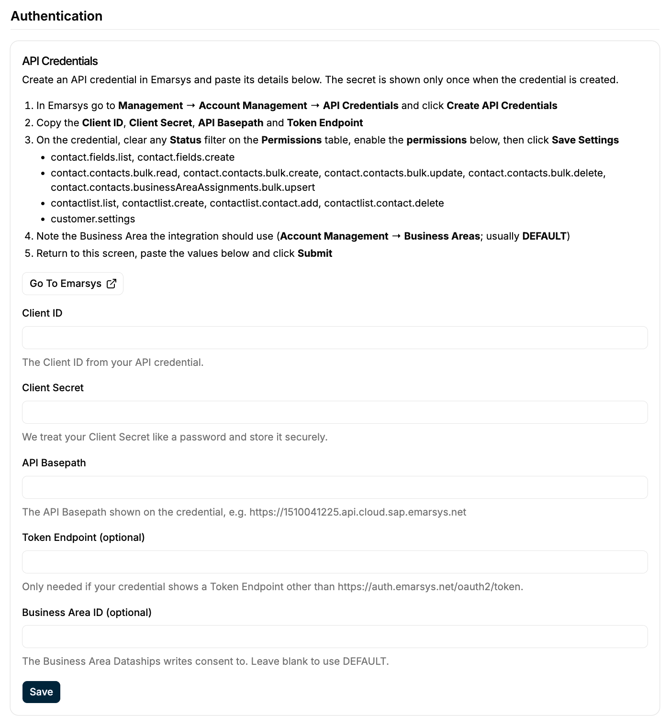
- Go to Integrations › Marketing Platforms › Emarsys › Install
- Paste the Client ID into the Client ID field
- Paste the Client Secret into the Client Secret field
- Paste the API Basepath into the API Basepath field (for example, https://1510041225.api.cloud.sap.emarsys.net)
- If your credential shows a Token Endpoint other than https://auth.emarsys.net/oauth2/token, paste it into Token Endpoint. Otherwise, leave it blank
- If you want Dataships to use a Business Area other than DEFAULT, enter it in Business Area ID. Otherwise, leave it blank
- Click Save
Your Client Secret is stored securely and masked after saving. You will see a confirmation message once authentication succeeds.
Step 3: Configure Your Email Lists
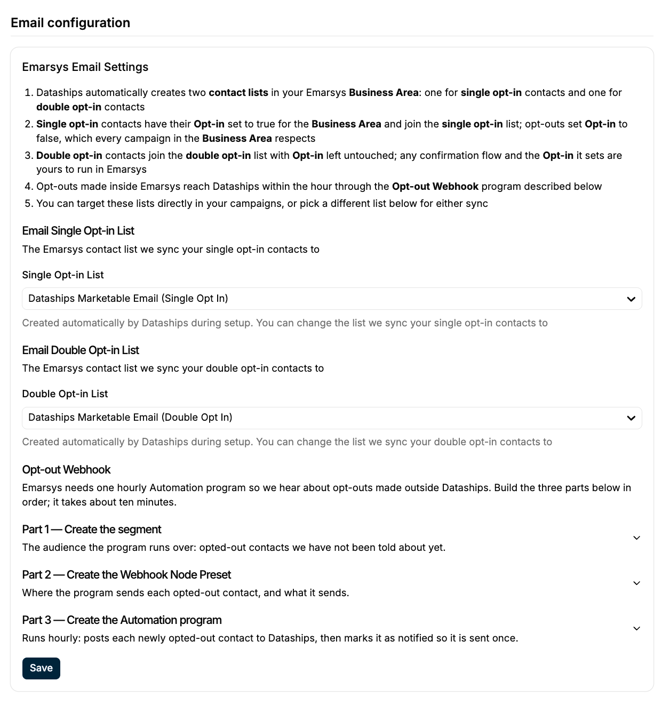
Once authenticated, Dataships automatically creates two contact lists in your Emarsys Business Area:
- Dataships Marketable Email (Single Opt In)
- Dataships Marketable Email (Double Opt In)
You can target these lists directly in your campaigns, or choose different lists:
- Go to Integrations › Emarsys › Configure
- Under Email configuration, select a list from the Email Single Opt-in List and Email Double Opt-in List dropdowns
- Click Save
How consent is synced:
- Single opt-in contacts join the single opt-in list and have Opt-in set to true for your Business Area. If they opt out, Dataships sets Opt-in to false, and every campaign in the Business Area respects it.
- Double opt-in contacts join the double opt-in list with Opt-in left unchanged. Any confirmation flow, and the Opt-in it sets, is run by you in Emarsys.
Step 4: Set Up the Opt-out Webhook
Once authenticated, Dataships automatically creates two contact lists in your Emarsys Business Area:
When a shopper unsubscribes inside Emarsys, Dataships needs to know about it. To do this, you build one Automation program in Emarsys that runs every hour and sends newly opted-out contacts to Dataships. It has three parts, built in order, and takes about ten minutes.
You will find this section, along with your Webhook URL and token, under Integrations › Emarsys › Configure › Email configuration › Opt-out Webhook.
Part 1: Create the segment
This segment finds contacts who have opted out and whose opt-out Dataships has not been told about yet.
- In Emarsys, go to Contacts › Segments and check the Business Area selector shows the Business Area Dataships uses
- Click Create segment and choose a standard segment
- Click Contact, Email behaviour, SMS and Universal Schema Segment
- Name it Dataships opted out
- Add a criterion: Opt-in is equal to False
- Add a criterion: Dataships Email Consented At is not empty
- Add a criterion: Dataships Email Opt-out Notified is empty
- Save the segment
Part 2: Create the Webhook Node Preset
This preset tells Emarsys where to send each opted-out contact and what to include.
- In Emarsys, go to Management › Data Management › Webhook Node Presets and click Create Preset
- Name the preset Dataships opt-out
- Copy the Webhook URL from the Dataships Control Panel and paste it into API endpoint URL
- Leave HTTP basic authentication selected and enter dataships as both the username and the password. The request is authenticated by your token, not by these
- Under Contact data, add the four key/value pairs in the table below. Type the key, then pick the value from the contact field list
- Under Additional data, click Add Field, enter the key dataships_token with data type text, and set its single predefined value to the token shown in the Dataships Control Panel
- Under Operational Data, leave deduplication_id, ems_program_id and event_time switched on
- Save the preset
|
Key |
Value (contact field) |
|
|
|
|
optin |
Opt-In |
|
optin_date |
Opt-in Date |
|
consented_at |
Dataships Email Consented At |
Important: Your dataships_token identifies your account to Dataships. Treat it like a password and do not share it.
Part 3: Create the Automation program
This program runs every hour, sends each newly opted-out contact to Dataships, then marks the contact as notified so it is only sent once.
- In Emarsys, go to Automation Programs and click Create Program, then Audience-based journeys
- Name the program Dataships opt-out webhook
- Drag a Recurring entry point onto the canvas and set it to run every 1 hour
- Open the Segment node it created and select the Dataships opted out segment
- With the Segment node selected, click Webhook in the Channels list and pick the Dataships opt-out preset
- With the Webhook node selected, click Set Contact Field in the Actions list and set ds_email_optout_notified (Dataships Email Opt-out Notified) to the current date and time
- Save the program, then use the Status menu to Activate it
Viewing Your Lists in Emarsys
- Sign into Emarsys
- Go to Contacts › Contact Lists
- Check the Dataships lists appear
Contacts are added as shoppers consent at checkout, so it is normal for the lists to be empty straight after setup.
Uninstalling the Integration
Click the trash icon on the Emarsys card under Integrations › Marketing Platforms and confirm. This stops new syncing, but keeps existing contacts and lists in Emarsys. You should also deactivate the Dataships opt-out webhook Automation program in Emarsys.
Uninstalling the Integration
Click the trash icon on the Emarsys card under Integrations › Marketing Platforms and confirm. This stops new syncing, but keeps existing contacts and lists in Emarsys. You should also deactivate the Dataships opt-out webhook Automation program in Emarsys.
Frequently Asked Questions
Why do I need an API credential instead of signing in?
Emarsys uses API credentials rather than a one-click sign-in, so you create a credential in Emarsys and paste its details into Dataships.
Where do I find my API Basepath and Token Endpoint?
Both are shown on the API credential under Management › Account Management › API Credentials in Emarsys.
I lost my Client Secret. What do I do?
Emarsys only shows the Client Secret once. Create a new API credential with the same permissions, then update your details in the Dataships Control Panel under Integrations › Marketing Platforms › Emarsys › Configure › Authentication.
Which Business Area should I use?
Most accounts use DEFAULT. If you run more than one Business Area, enter the one your campaigns send from. Opt-in applies to the whole Business Area, so an opt-out stops every campaign in that Business Area.
Why are there two lists?
Keeping single and double opt-in contacts in separate lists means the consent type captured at checkout is preserved in Emarsys.
Can I use existing lists?
Yes. Select your preferred lists in Step 3.
Do I have to set up the opt-out webhook?
Yes. Without it, Dataships is not told when a shopper unsubscribes inside Emarsys, so your consent records in Dataships will be out of date.
Opt-outs from Emarsys are not reaching Dataships. What should I check?
- The Dataships opt-out webhook program is activated
- The Dataships opted out segment was created in the Business Area Dataships uses, with all three criteria
- The dataships_token in the preset matches the token in the Dataships Control Panel
- The Set Contact Field action sets ds_email_optout_notified
Opt-outs can take up to an hour to reach Dataships.
What happens to contacts after uninstalling?
Uninstalling only stops future syncing. Dataships will not remove or change any contacts already in your Emarsys account.
Can I update my credentials later?
Yes, via Integrations › Marketing Platforms › Emarsys › Configure › Authentication.