.png?width=250&height=45&name=Full_logo_dark%20(1).png)
Overview
This guide explains how to connect your Listrak account to Dataships. Once connected, Dataships automatically syncs consented email subscribers from your checkout into Listrak, so your marketing lists stay current without manual exports or imports. Opt-outs made inside Listrak are picked up by Dataships automatically, so consent stays in sync on both sides.
Listrak does not use a one-click sign-in. Instead, you create an Email API integration in Listrak and paste its Client ID and Client Secret into the Dataships Control Panel.
Setup has four steps:
- Create an Email API integration in Listrak
- Save your credentials in Dataships
- Create your email lists in Listrak
- Select your lists in Dataships
Finding the Integration
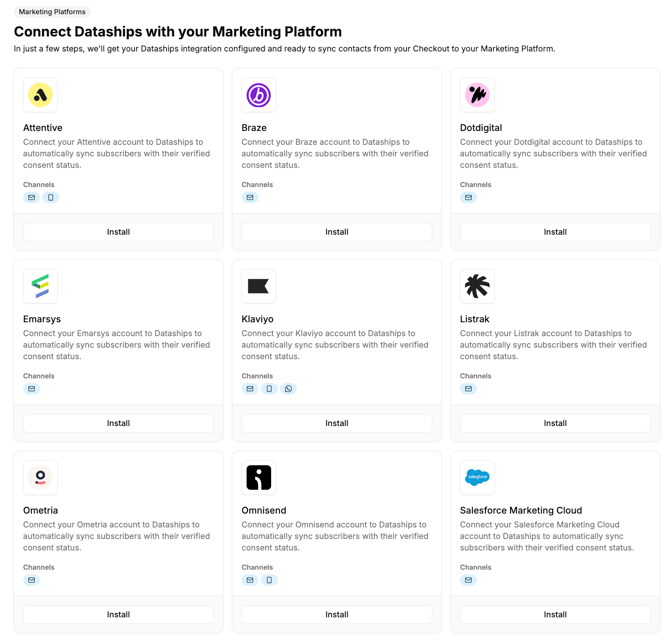
In the Dataships Control Panel, go to Integrations › Marketing Platforms in the left panel. Locate the Listrak card and click Install to begin setup.
If Listrak is already installed, click Configure and choose Authentication from the sidebar to update your credentials.
Step 1: Create an Email API Integration in Listrak
Create a dedicated integration in your Listrak account so Dataships can sync contacts on your behalf.
- Sign in to Listrak and go to Manage › Integrations › Integrations Management
- Click New Integration
- Choose the Email integration type
- Grant access to Contact, Event, List, Reporting and Segmentation
- Save the integration
- Copy the Client ID and Client Secret
Important: If you restrict the integration to specific IP addresses, contact Dataships support for the addresses to allow. Without them, Dataships cannot connect to your Listrak account.
Tip: Keep the integration dedicated to Dataships rather than reusing an existing one. This makes it easier to audit activity and to rotate credentials later without affecting your other integrations.
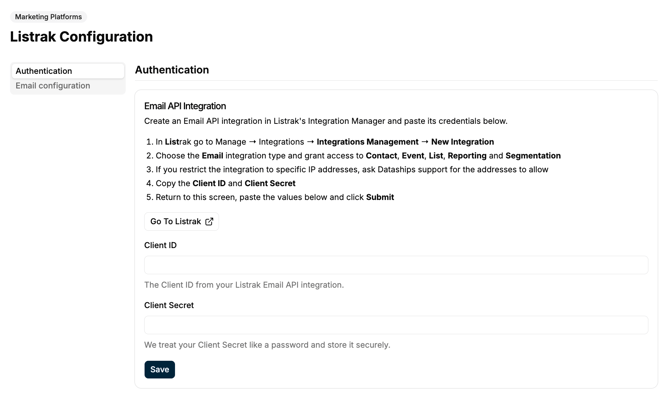
Step 2: Save Your Credentials in Dataships
Return to the Dataships Control Panel.
- Go to Integrations › Marketing Platforms › Listrak › Install
- Paste the Client ID into the Client ID field
- Paste the Client Secret into the Client Secret field
- Click Save
Dataships treats your Client Secret like a password and stores it securely. It is masked after saving, and a confirmation message appears once the integration is authenticated.
Step 3: Create Your Email Lists in Listrak
Dataships syncs your contacts to two Listrak lists, one for single opt-in contacts and one for double opt-in contacts. Create both lists in Listrak and turn on Double Opt-In for the double opt-in list before you select them in Dataships, as Listrak sends the confirmation email to your double opt-in contacts.
- In the Dataships Control Panel, go to Integrations › Listrak › Configure › Email configuration
- Click Go To List Manager to open Listrak’s List Manager
- Create two new email lists, named exactly Dataships Email Single Opt-In and Dataships Email Double Opt-In
- Open the configuration of your Dataships Email Double Opt-In list, enable Double Opt-In and save the list.
- Leave Double Opt-In disabled on your Dataships Email Single Opt-In list
Step 4: Select Your Lists in Dataships
Once both lists are set up in Listrak, select them in Dataships. Lists named exactly as in Step 3 are selected for you.
- Go back to the Dataships Control Panel and click Refresh under Create your Email Lists in Listrak to load your new lists
- Under Double Opt-in List Consent Status, click Refresh to check that Double Opt-In is enabled
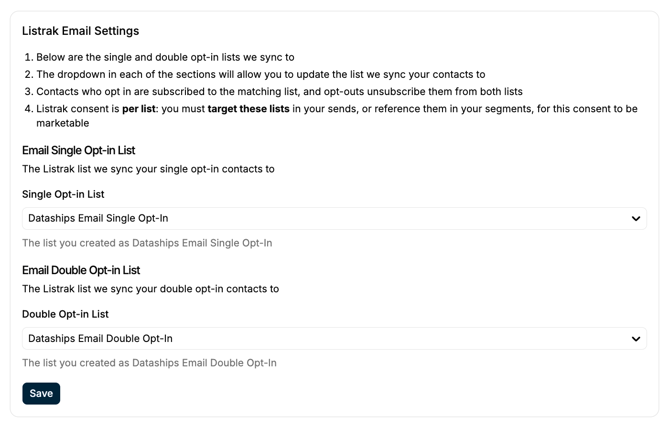
- Under Listrak Email Settings, check that Dataships Email Single Opt-In is selected in the Email Single Opt-in List dropdown
- Check that Dataships Email Double Opt-In is selected in the Email Double Opt-in List dropdown
- Click Save
Changing the Lists Dataships Syncs To
The two Dataships lists are selected by default. To use different lists:
- Go to Integrations › Listrak › Configure › Email configuration
- Under Listrak Email Settings, select a list from the Email Single Opt-in List dropdown
- Select a list from the Email Double Opt-in List dropdown
- Click Save
How Consent Is Synced
- Single opt-in: contacts are subscribed to your single opt-in list straight away.
- Double opt-in: contacts are added to your double opt-in list and Listrak sends them its confirmation email.
- Opt-outs at checkout: when a shopper opts out through Dataships, they are unsubscribed from both lists.
- Opt-outs in Listrak: when a shopper unsubscribes inside Listrak, Dataships picks it up automatically and updates their consent record. There is nothing to set up in Listrak for this.
Important: Listrak stores consent per list. To make sure you only market to consented contacts, target the Dataships lists in your sends, or reference them in your segments.
Viewing Your Lists in Listrak
To check that contacts are arriving:
- Sign in to Listrak
- Open List Manager
- Look for the two Dataships lists, or for whichever lists you selected under Listrak Email Settings
New contacts appear in these lists as they consent at checkout, so it is normal for the lists to be empty immediately after setup and to fill up as orders come through.
Uninstalling the Integration
To remove Listrak, go to Integrations › Marketing Platforms, click the trash icon on the Listrak card, and confirm in the modal.
Uninstalling stops Dataships from syncing any new contacts to Listrak. It does not remove or alter existing contacts in your Listrak account, and it does not delete your lists.
Frequently Asked Questions
Why do I need a Client ID and Client Secret instead of just clicking connect?
Listrak does not offer a one-click authorisation screen. Creating an Email API integration in Listrak and pasting its Client ID and Client Secret into Dataships achieves the same result.
Where do I find my Client ID and Client Secret?
They are shown on your Email API integration in Listrak under Manage › Integrations › Integrations Management.
Why do I need to create the lists myself?
Dataships uses the lists you create in Listrak. If you name them exactly as shown in Step 3, Dataships selects them for you when you click Refresh.
Why are there two lists?
Keeping single opt-in and double opt-in contacts in separate lists means the consent type captured at checkout is preserved in Listrak, so you can build campaigns that respect how each contact opted in.
Can I use my own existing Listrak lists instead?
Yes. Select your own lists from the Email Single Opt-in List and Email Double Opt-in List dropdowns under Listrak Email Settings and click Save. Make sure Double Opt-In is enabled on the list you use for double opt-in contacts.
Do I need to set anything up in Listrak for opt-outs?
No. Dataships picks up unsubscribes made in Listrak automatically.
What happens to my contacts if I uninstall?
Uninstalling only stops future syncing. Dataships will not remove or change any contacts already in your Listrak account.
Can I update my credentials later?
Yes. Go to Integrations › Marketing Platforms › Listrak › Configure › Authentication, enter the new Client ID and Client Secret, and click Save.
If you see an authentication error after saving your credentials, check that the Client ID and Client Secret were copied in full, that the integration has access to Contact, Event, List, Reporting and Segmentation, and that the integration is active in Listrak. If you restrict the integration to specific IP addresses, check that the Dataships addresses are allowed.