This article walks you through two things: connecting your Klaviyo account to Dataships, and choosing which Klaviyo lists receive your consented subscribers. The connection uses OAuth — so there are no API keys to find or paste. One click, you authorise Dataships in Klaviyo, and you're connected. Once both steps are complete, every checkout consent syncs to Klaviyo automatically.
Step 1: Connect Klaviyo with OAuth
In Dataships, go to Integrations → Marketing Platforms. Find the Klaviyo card and click Install to open the Klaviyo Configuration screen, then click Install Klaviyo in the Auth Configuration section.
- Click Install Klaviyo. You'll be redirected to Klaviyo's authorisation page in a new window. If you're not already signed in to Klaviyo, log in first.
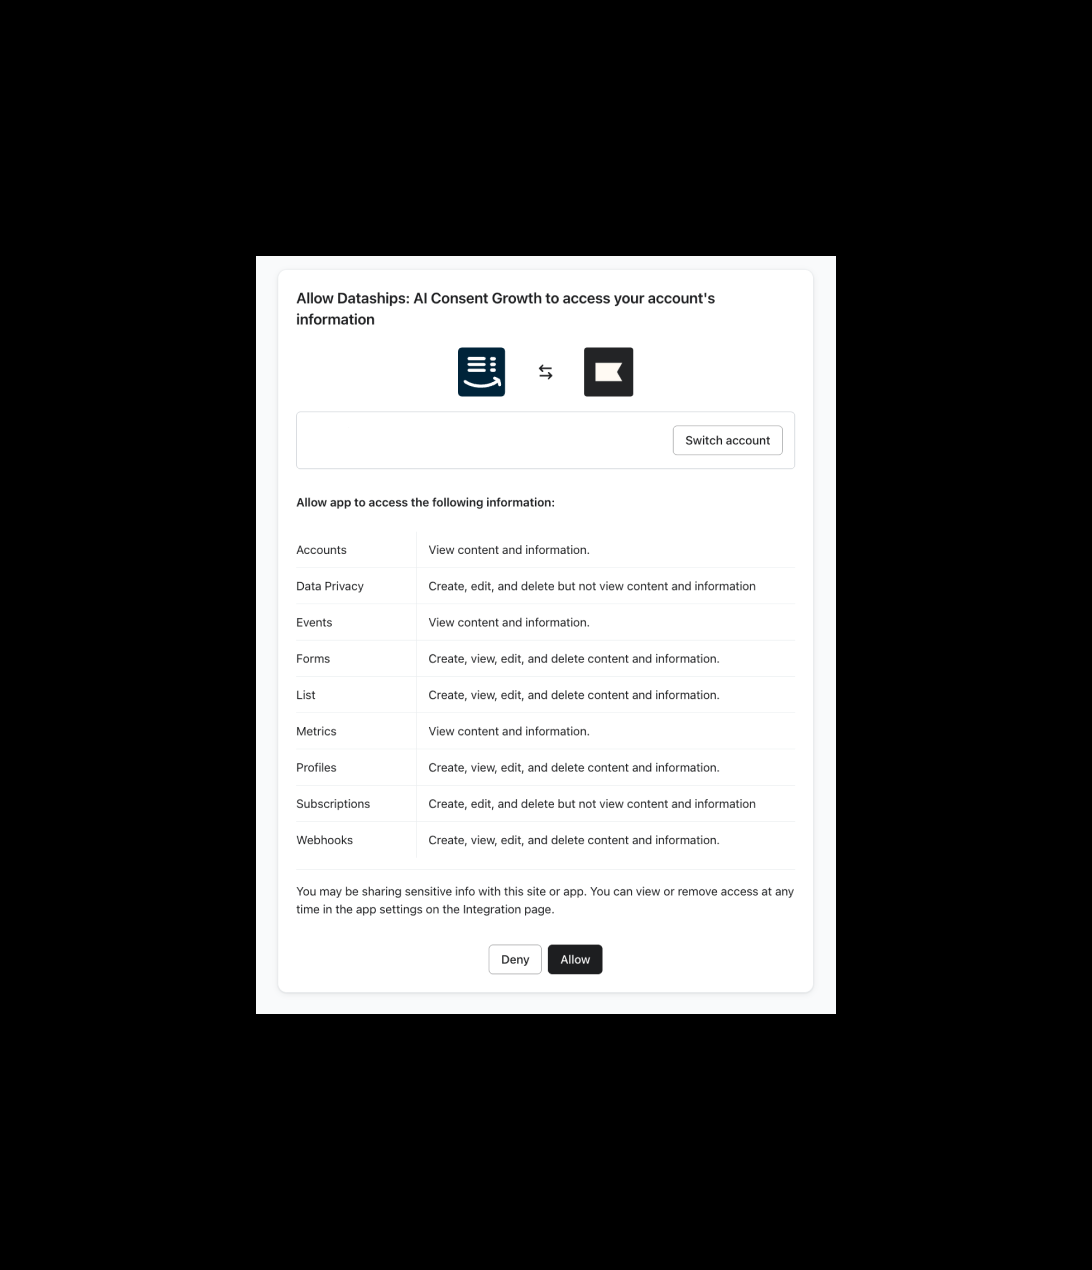
- Review the access Dataships is requesting, then click Allow to authorise the connection.
- You'll be returned to Dataships automatically. The connection is now active — no API key required.
If you see an error after authorising
- If you clicked Deny on Klaviyo's page, the connection won't complete. Return to the Klaviyo Configuration screen and click Install Klaviyo again, then click Allow.
- If the connection fails for any other reason, click Install Klaviyo to retry. Make sure you're logged in to the correct Klaviyo account before authorising.
Step 2: Configure email sync
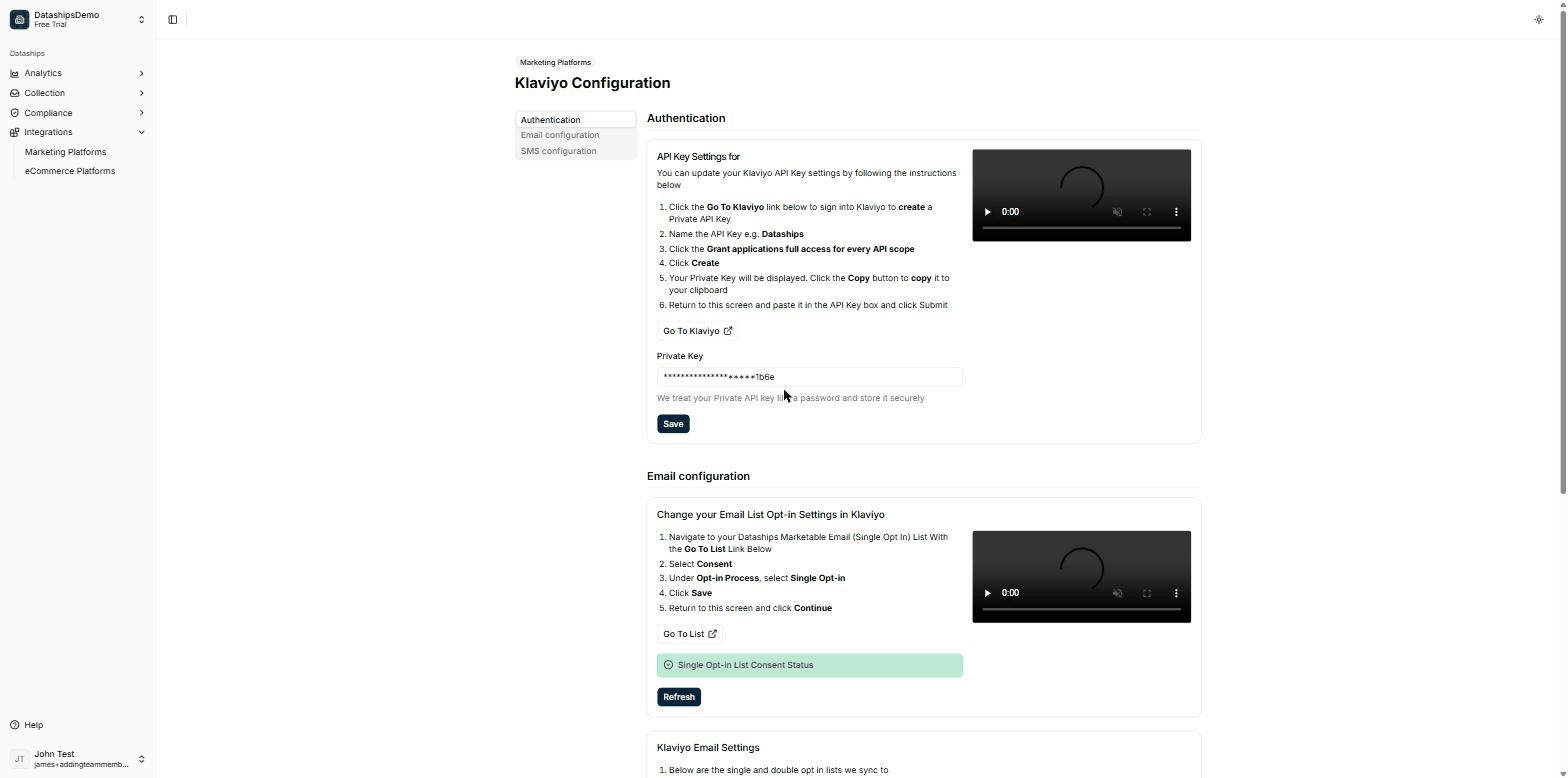
After connecting, you'll land on the Email configuration tab of the Klaviyo Configuration screen (Integrations → Marketing Platforms → Klaviyo → Configure). This is where you tell Dataships how to handle single opt-in and which lists to sync to.
There are two parts to complete.
Card 1 — Update your list's opt-in setting in Klaviyo
Klaviyo lists default to double opt-in. For Dataships to sync single opt-in consents correctly, you need to change your Dataships list's setting directly in Klaviyo:
- Click the Go To List link to open your Dataships Marketable Email (Single Opt In) List in Klaviyo.
- Select Consent.
- Under Opt-in Process, select Single Opt-in.
- Click Save.
- Return to this screen and click Continue.
The Single Opt-in List Consent Status indicator confirms when Dataships has detected the change. A green status means you're good to go. If it hasn't updated yet, click Refresh — see the FAQ below.

Card 2 — Select your sync lists
Under Klaviyo Email Settings, choose which Klaviyo lists receive your consented subscribers:
- Use the Single Opt-in List dropdown to select the list for single opt-in contacts.
- Use the Double Opt-in List dropdown to select the list for double opt-in contacts.
- Click Save when done.
Both dropdowns show your actual Klaviyo lists, fetched live from your account.
Step 3: SMS (optional)
If you want to collect SMS consent through Dataships, open the SMS configuration tab on the same Klaviyo Configuration screen. SMS setup follows the same opt-in pattern as email. If you don't see SMS as an option, or you'd like a hand setting it up, reach out to your Dataships contact or the support team.
During onboarding
If you're setting up Dataships for the first time, you'll see a progress bar at the bottom of each screen guiding you through the steps. Connect your Klaviyo account, configure your lists, and click Next on each screen to move through onboarding.
Updating your settings later
You can change your list selections at any time. Go to Integrations → Marketing Platforms → Klaviyo → Configure, update the dropdowns in Card 2, and click Save. Updates take effect immediately and apply to all new consents from that point forward.
FAQ
Do I need a Klaviyo API key?
No. Dataships connects to Klaviyo using OAuth — you simply click Install Klaviyo and authorise the connection in Klaviyo by clicking Allow. There's no key to generate, copy, or paste. (Older accounts connected with a Private API Key still work, but OAuth is the method for new connections.)
What access does Dataships get in my Klaviyo account?
When you authorise the connection, Klaviyo shows you exactly what Dataships can access — including lists, profiles, subscriptions, and data privacy. This access is what lets Dataships sync consented contacts to the right lists. You can review or remove Dataships' access at any time from the Integrations page in your Klaviyo settings.
I clicked Deny by mistake — how do I reconnect?
Go to Integrations → Marketing Platforms → Klaviyo, click Install Klaviyo again, and click Allow on Klaviyo's authorisation page. Declining the first time doesn't block you from reconnecting.
What's the difference between single and double opt-in lists?
With single opt-in, a subscriber is added to your list immediately when they consent at checkout — no confirmation email required. With double opt-in, Klaviyo sends a confirmation email and the subscriber is only added once they click the link. Dataships routes each contact to the correct list based on what they consented to.
The consent status hasn't updated — what do I do?
This means Dataships hasn't detected the opt-in setting change on your Klaviyo list yet. Make sure you've saved the Single Opt-in setting in Klaviyo (Card 1 steps above), then click the Refresh button next to the status indicator. If it still hasn't updated after a minute or two, double-check that you changed the correct list — the one linked by the Go To List button.
Can I change my lists later?
Yes. Go to Integrations → Marketing Platforms → Klaviyo → Configure, update the dropdowns in Card 2, and click Save. The change applies to all new consents from that point forward.