Your Dataships subscription details — including your current plan, how many verified contacts you've collected, and how close you are to your tier threshold — are all in one place: the Billing screen. It's not in the main sidebar navigation; you get to it through your account menu instead.
Finding the Billing screen
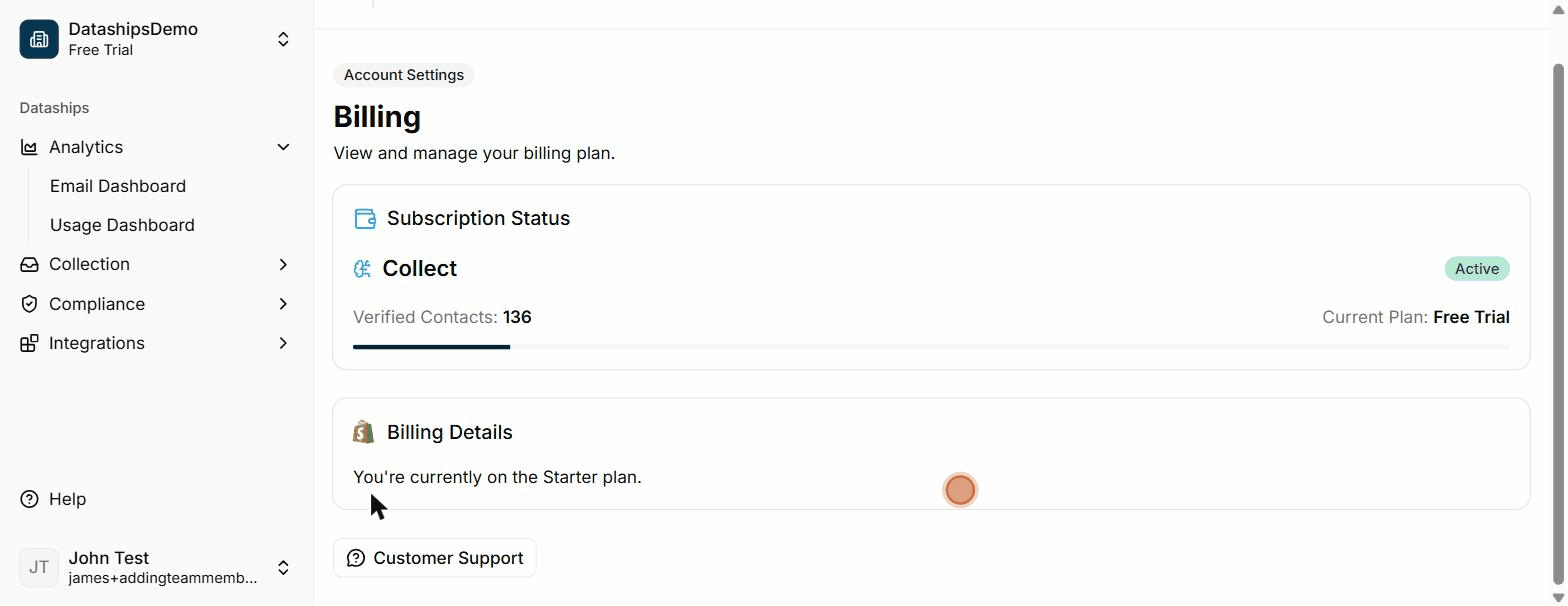
Click your name or avatar in the bottom-left corner of the app. A small menu will appear — select Billing from that menu. You'll land on a screen showing your current subscription status.
Reading your subscription status
When you have an active subscription, the Subscription Status card shows you everything you need to know about where you stand.
- Product name — the Dataships product you're subscribed to (for example, "Collect"), shown with an Active badge in green.
- Verified Contacts — the total number of contacts Dataships has processed and verified on your account to date.
- Current Plan — the name of the tier you're on right now (Free Trial, Starter, Plus, Pro, or Custom).
- Progress bar — a visual indicator showing how many of your verified contacts have been used against your current tier's threshold. As you get closer to the limit, this bar fills up. When you hit the threshold, you'll be prompted to upgrade.
Plan tiers explained
Dataships has five plan tiers. Your current tier is shown in the Current Plan field.
- Free Trial — you're in the trial period and haven't yet moved to a paid plan.
- Starter — the entry-level paid plan, suited to stores just getting started with Dataships.
- Plus — the next step up, for stores with higher verified contact volumes.
- Pro — for high-volume stores with larger contact lists.
- Custom — an enterprise-level arrangement with pricing tailored to your account. If you're on a Custom plan, reach out to your account manager with any questions about your terms.
Billing is handled by Shopify
Dataships billing runs through Shopify — your charges appear in your Shopify account alongside your other app subscriptions. To view invoices, check payment history, or update payment details, click the Go to Shopify button in the Billing Details card. This takes you directly to the relevant section of your Shopify Admin.
What happens when you exceed your tier threshold
When your verified contacts count passes the threshold for your current plan, you'll see an alert at the top of the Billing screen: "Your plan requires an upgrade." At that point, you'll need to upgrade to the next tier to keep collecting new contacts via Dataships. Click the Upgrade my plan button in the alert to kick off that process — it will take you to Shopify to approve the new charge.
Restarting a cancelled subscription
If your subscription was cancelled or the approval window for a new charge expired, you'll see a Subscription Not Activated alert when you open the Billing screen. You can restart your subscription at any time by clicking the Restart Subscription button. If you run into any trouble, the Contact support link in the same alert will get you straight through to the team.
Cancelling your subscription
To cancel, click the Cancel Subscription button at the bottom of the Billing screen. A confirmation modal will appear before anything is changed — it will ask you to confirm, and remind you of what happens next.
What the cancellation modal tells you: "Once you cancel you will still have access to the verified contacts you have collected, but you will no longer collect new contacts via Dataships. If you change your mind, you can reactivate your account at any time."
In plain terms: your existing verified contacts stay in place, but Dataships stops processing new ones at your checkout. You can reactivate whenever you're ready.
Contacting support
The Customer Support button is always visible at the bottom of the Billing screen. Click it to send a message directly to the Dataships support team. You can also reach support from the cancellation screen if you'd rather talk things through before making a decision.
FAQ
Where can I see my invoice?
Invoices and billing history are managed through Shopify, not within the Dataships app. Click Go to Shopify in the Billing Details card to access your payment records in your Shopify Admin.
What happens to my data if I cancel?
Your existing verified contacts — everyone Dataships has already processed and added to your records — stay on your account. You won't lose that history. What stops is new contact collection: Dataships will no longer process contacts at your checkout after cancellation. You can reactivate at any time to start collecting again.
What does the progress bar show?
It shows how your current verified contacts count compares to the threshold for your plan tier. When the bar is full, you've hit your limit and will need to upgrade to continue. It's a quick visual check on where you stand without having to do any maths.